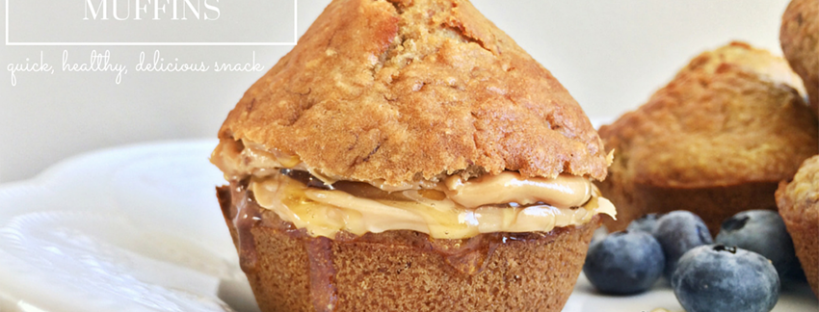
honey, coconut & banana health muffins. www.cocobean.me

Honey, Coconut & Banana Health Muffins

Muffins are the ideal snack for anytime of the day! These healthy honey, coconut & banana muffins are the perfect pick-me-up to enjoy for breakfast, in your lunchbox, with a cup of afternoon tea or coffee or an after dinner sweet treat. I love using stoneground flour as it has so many added benefits for your body. It is so much better for you than normal white or wholewheat flour! If you can’t find stoneground flour then you can also use wholewheat flour.

honey, coconut & banana health muffins. www.cocobean.me

This recipe has no refined sugar, only raw honey and banana are used to sweeten these delightful morsels of deliciousness. I like to use overripe bananas as they are much easier to mash and also give a sweeter, deeper flavour to the muffins.

I am not the biggest fan of eating bananas, but I love baking with bananas as it adds extra sweetness (therefore you use less sugar) and also adds an amazing moist texture to your baked product! The health benefits of bananas are also so impressive that it is a good way to get them into your diet (if you are like me and don’t like the taste of them). They help to boost your digestion and metabolism, are an excellent source of potassium which is essential for a healthy heart, blood pressure, bone health and reduces muscles cramps! If you eat these after exercising, it will really reduce your muscle cramps, or if you are pregnant like me and get leg cramps at night.. these really help! Bananas are also excellent to make your body alkaline, so eat them if you suffer from stomach ulcers or heartburn.

honey, coconut & banana health muffins. www.cocobean.me

I used the stoneground brown bread flour from Eureka Mills for this recipe, but Im sure any of the other flours will be just as perfect! It is a super quick recipe to throw together and only uses one bowl! Therefore less washing up to do (yes please!!).

I like to store half in the fridge to nibble on whenever I feel like having a delicious snack and I keep the other half in ziploc bags in the freezer. They are so easy to defrost or just pop one in the microwave for an even quicker defrost. Then you will always have a snack on hand for those unplanned visitors and breakfast on the go!

Honey, Coconut & Banana Health Muffins

makes about 20 muffins

1 cup milk (I like to use coconut or almond milk)

1/2 cup honey

1 tsp vanilla

3/4 cup mashed banana (or apple sauce)

2 Tbsp coconut oil

2 eggs, beaten

1 1/2 cups stoneground flour (or wholewheat flour)

1 tsp baking powder

1 tsp bicarbonate of soda

1/2 cup desiccated coconut

Preheat your oven to 180 C. Line 2 muffins trays with cupcake cases or grease with butter.

In a large bowl, whisk all wet ingredients together (milk, honey, vanilla, mashed banana, coconut oil and eggs).

Add the coconut and sieve the dry ingredients into the whisked wet ingredients. Mix until all of the ingredients are combined. Remember to never over mix muffins!

Spoon the mixture into your prepared muffin cases and bake for 18-20 mins.

Let them cool in the pan for a few minutes before transferring them to a cooling rack.

Eat them just as it, spread with butter or nutella or my favourite combination on these muffins: peanut butter and honey!

honey, coconut & banana health muffins. www.cocobean.me

  • Add chopped nuts, cinnamon, blueberries, chopped dates, chocolate chips etc for extra deliciousness
cinnamon honey nut granola. www.cocobean.me

Cinnamon Honey Nut Granola

This cinnamon, honey nut granola is my absolute new favourite breakfast! It has the perfect balance of sweetness from the cranberries, raisins and honey, the perfect crunch from the deliciously roasted nuts and seeds and then the coconut flakes enveloped in fragrant cinnamon round it off to perfection. I really love this healthy nutty crunchy granola and could eat it every single day for the rest of my life! Everyone who tastes it loves it and always begs for the recipe, so here it is, with love. This cinnamon honey granola not only tastes incredible, it is also satisfying and nutritious in every way. There is always a large jar (or 2) in my home as it gets devoured before I know it!

cinnamon honey nut granola. www.cocobean.me

A healthy granola really is the best way to start your day, especially when eaten with fresh fruit such as strawberries, blueberries and banana. I love eating it on top of a smooth and creamy yoghurt, the textures are perfect together, or drenched in fresh almond milk (or coconut milk or any milk for that matter) or sprinkled over a colourful smoothie bowl for some crunchy satisfaction. You will be getting so many amazing nutrients first thing in the morning, that you will glowing, happy and energetic for the rest of the day! The brazil nuts, hazelnuts, almonds and seeds add such a good protein punch that you will be full for longer and glowing from all of the omega 3 and vitamin E! I love adding cinnamon to my granola or muesli as it gives the most amazing flavour and fragrance and most importantly it also helps to stabilize your blood sugar levels.

cinnamon honey nut granola. www.cocobean.me

I have used coconut oil in this recipe as it is one of my favourite ingredients. I find that it gives such a beautiful subtle flavour to the granola and also helps to give it the perfect crunch that we are after! Coconut oil has incredible health benefits, to name a few, it helps to reduce obesity, improves your metabolism, protects your body against insulin resistance therefore helping to reduce your risk of getting diabetes. Coconut oil also helps to boost your immunity as it kills harmful bacteria in your body! Amazing!

cinnamon honey nut granola. www.cocobean.me

Now all of that combined with the nutrients, vitamins, minerals, antioxidants and protein gives you the perfect breakfast or snack for anytime of the day! It really is so delicious that I eat handfuls of it when I want a snack or after dinner for a little bit of sweetness. I promise that it is so much better than store bought granola or muesli, tastes better, is so much healthier and more nourishing and also much cheaper. I buy nuts and seeds in bulk to make a big batch of it and it can stay fresh for weeks! You can buy nuts in bulk here from amazon. So it really is worth making your own, that way you know that you are giving your body the best possible nutrition and love that it deserves.

Cinnamon Honey Nut Granola

(makes one large jar)

1 cup brazil nuts

1 cup almonds

1/2 cup hazelnuts (skinned)

1/2 cup flaxseeds

1/2 cup pumpkin seeds

1/2 cup sunflower seeds

1 cup coconut flakes

2 cups oats

3 Tbsp coconut oil

2 Tbsp honey (or maple syrup)

2 tsp cinnamon

1/2 cup raisins

1/2 cup dried cranberries

Preheat the oven to 180 C.

Chop the nuts so that they are nice and chunky. You can place the nuts into a food processor and pulse to chop them, if you don’t feel like chopping them all up by hand.

Pour the nuts, seeds, coconut flakes and oats into a large mixing bowl.

Pour the coconut oil, honey and cinnamon into a small pot on the stove and melt until all of the ingredients are combined. You can also do this in the microwave for about 40 seconds.

Add the coconut oil mixture to the other ingredients in the large bowl and stir to coat all of the ingredients in the delicious honey syrup. Pour the mixture into a baking tray and bake for 30 minutes, stirring every 10 minutes so that the granola turns a beautiful golden brown colour, rather than burning.

Once it has finished baking, remove it from the oven and leave it to cool down. Now you can stir the raisins and dried cranberries through the golden granola and pour into a glass jar or any air tight container. It will stay crunchy and fresh for weeks!

cinnamon honey nut granola. www.cocobean.me

What is your favourite breakfast? Let me know if you try this recipe, I love hearing from you.

If you enjoyed this recipe you will also like my

Pecan, Date & Cranberry Muesli,

Creamy Cinnamon & Date Oats

Carrot Cake Pancakes.

chocolate energy bites. www.cocobean.me

Chocolate Energy Bites

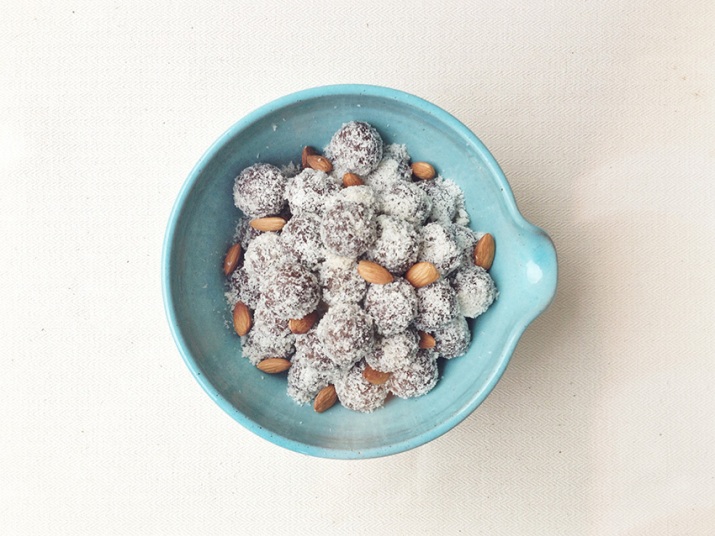
These little bites of chocolatey goodness are one of my favourite healthy snacks. They are completely raw and contain so much goodness in every single bite, not to mention that they are absolutely delicious too! Filled with nuts, chia seeds, dates, raw cacao, maca and coconut oil you will get the best plant protein and healthy fats that your body needs! I always have a big batch of energy balls (try my date balls too) in the fridge as they are the perfect snack for anytime of the day. I sometimes have mine with my morning smoothie, cut up and added to granola, as an afternoon pick me up or after dinner when my sweet tooth needs a little bit of satisfying! These chocolate energy bites (vegan & paleo) will keep you energized all day, feeling incredible, healthy and glowing from the inside out!

chocolate energy bites. www.cocobean.me

If you are anything like me and you love chocolate then these are the snack for you! The raw cacao gives such a deep and delicious chocolate flavour and it also adds the most incredible antioxidant boost that you will ever get! Raw cacao has more antioxidants than green tea and fruit, it is one of the richest sources of antioxidants in the world. So now you can get your chocolate fix without any guilt! The almonds, chia seeds and pecan nuts give you an excellent amount of protein, healthy fats, calcium, fibre and also a delicious nutty flavour. I love adding coconut oil to my energy balls as it helps to give a creamy texture, binds the ingredients together and also boosts the health benefits substantially! Coconut oil actually boosts your metabolism, prevent diabetes and reduces your risk of obesity! It’s anti-bacterial properties help your body function optimally and boosts your immunity. I love it!

If you haven’t heard of maca, it is an incredible food to add to your daily lifestyle! Maca helps to increase your energy levels, stamina, memory and sexual function. It also helps to prevent depression and cancer. I love adding the maca powder to my smoothies and energy balls as it doesn’t give much flavour but it is so incredibly good for you that I try to have it everyday. All of these ingredients go so well together, it’s really quick and easy to make and there’s hardly any washing up to do!

chocolate energy bites. www.cocobean.me

Chocolate Energy Bites

Makes 25-30 balls, depending on size

1/2 cup almonds

1/2 cup pecan nuts

2 Tbsp chia seeds

1/2 cup coconut

1 1/2 Tbsp raw cacao

2 tsp maca powder

1/4 cup oats

2 tsp coconut oil

1 1/2 Tbsp almond butter (or any nut butter)

1 1/2 cups dates (pitted)

2 tsp honey or agave

Simply throw all of the ingredients into a food processor. Pulse a few times to get everything mixing together and then blend it until all of the ingredients are combined and a sticky consistency is formed.

scoop out some of the mixture and roll it into balls. I like to use a tablespoon to scoop the mixture out, so that they are all the same size. Then roll it in coconut or cacao.

Store in an airtight container in the fridge for 3-4 weeks (if you don’t eat them all by then).

chocolate energy bites. www.cocobean.me

If you enjoyed this recipe, you will love my Date Balls and Raw Vegan Chocolate Brownies too! They are such amazing snacks! xx


vanilla coconut chia pudding with berries. www.cocobean.me

Coconut Chia Pudding

Chia pudding makes the perfect snack, dessert or even breakfast! Completely healthy, versatile and oh so tasty too! I love topping mine with different fruits, berries, roasted coconut, muesli or some nuts and a drizzle of honey and cinnamon. This popular superfood is one of my favourites at the moment. If you are not familiar with chia seeds, let me enlighten you about their star qualities. These powerful little seeds are packed full of vitamins, minerals and best of all; antioxidants! They are an incredible source of omega 3 fatty acids which our bodies need for beautiful hair, nails and glowing skin, helping to reduce depression and heart disease and also reduce inflammation.

chia pudding with berries

Chia seeds have been around for thousands of years and were a staple food for the Mayans and Aztecs. They ate these seeds for extra energy and stamina (Don’t we all want extra stamina and sustainable energy!?). They are also high in protein and fiber, keeping you full for longer. I usually sprinkle my chia seeds onto salads, bread and muesli but this way of eating chia is so much more exciting and delicious! Pudding for breakfast will win me over every time!

Here’s what you need for the coconut chia pudding:

chia pudding ingredients

Chia seeds, coconut milk, vanilla extract, agave nectar.

chia seeds shake chia pudding until combined decorate with berries

Coconut Chia Pudding Recipe:

Serves 1

3 Tbsp chia seeds

3/4 cup coconut milk

1/2 tsp vanilla extract

1 1/2 tsp agave nectar (depending on how sweet you like it)

Pour coconut milk into an airtight jar or container. Pour chia seeds and vanilla into the milk. Place lid on the jar and shake it up until the seeds are all mixed with the coconut milk.

Place the jar in the fridge for 30 mins- 1 hour to thicken. Then Mix it and shake it up again and place it back into the fridge to thicken overnight (or for a few more hours).

When you are ready to eat it, stir the agave nectar into the pudding and decorate with berries, cranberries, goji berries and a sprinkling of coconut. I also love to top it with granola if I’m eating it for breakfast.

vanilla coconut chia pudding with berries

Eat up and enjoy!


coconut cream pie. www.cocobean.me

Perfect Coconut Cream Pie

I must admit that pies are not on my everyday to-do list. It almost feels as if there are too many steps involved in making pies, so I just skim over them in recipe books and choose another dessert or treat to make instead. Although, on the occasions that I do pop out a pie, I feel so proud of myself and my pie. They usually look exquisite, come out perfectly and require far less effort than I thought beforehand. This coconut cream pie is one of my new favourite desserts to make. It ticks all of the boxes and everyone always loves it, whether they are coconut lovers or not.

coconut cream pie. Cocobean blog

Think of these 4 glorious layers of goodness: a crisp, buttery base, creamy coconut custard filling, cloud like whipped cream and lastly a layer of perfectly roasted crunchy coconut flakes. The flavours of the coconut and custard merge into perfection on your palate, leaving you wanting more and more of this enticingly dreamy dessert. I also love how it is not overly-sweet and has a true coconut flavour from the coconut milk.. no fake stuff here!

coconut cream pie. Cocobean blog

First things first, you will need to make the pastry base of the pie. I would highly recommend using a loose bottom pie dish as it is much easier to get the pie out of, and it looks fancy having a pie with perfect pastry holding it together. If you do not have a loose bottom pie dish, not to worry, you can use any other tin or dish (just make sure that it is about 23cm wide and 4cm high). You need flour, softened butter, castor sugar and an egg.

coconut cream pie. Cocobean blog

Using an electric mixer with the paddle attachment, mix the flour and butter until crumb-like in consistency. Add the sugar and then the egg, mixing until it is all incorporated. You can also use your fingertips to rub the ingredients together.

coconut cream pie. Cocobean blog

Once the dough has formed, place it onto a floured work surface and knead it gently to bring it together (do not overwork this lovely dough). Wrap it in cling film and refrigerate for 20-30 mins.

coconut cream pie. Cocobean blog

Once the dough has rested in the fridge, roll it out on a lightly floured surface (to about 5mm thickness). Carefully lay the pastry over the tin and press it into the base and up the sides. Don’t worry if the pastry breaks or crumbles, just fill in the gaps and press it all together so that there are no holes. Cut the overhanging pastry off and prick the base with a fork. Place your base back in the fridge to rest for another 20-30 minutes. Once the pastry has rested, cover it with baking paper and fill it with baking beans or dry rice. Blind bake it for 12 minutes in a preheated oven of 170 C. Carefully remove the beans and the paper and bake the pastry for another 15 minutes, until golden in colour. Set aside to cool. Well done that’s your pastry (the hardest part) done and dusted!

coconut cream pie. Cocobean blog

While the pastry is baking, you can make the filling. Place the egg yolks and vanilla in a bowl and whisk them until combined and the yolks are all broken.

coconut cream pie. Cocobean blog

In a saucepan, mix the sugar, cornflour and salt together. Add 90ml of the coconut milk to it and whisk to form a smooth paste. Pour the remaining coconut milk and full cream milk into the mixture and stir to combine. Place the pan over a low heat and bring the mixture to the boil, whisking constantly. As soon it starts to thicken, take 3 Tablespoons of the hot milk mixture and stir it into the egg yolks, then pour the egg yolk mixture into the pan. Stir this mixture continuously, until the mixture is thick and looks like custard.

coconut cream pie. Cocobean blog

Pour the coconut custard mixture into the cooled base and cover it with cling film. Covering it immediately prevents a skin from forming over the custard. Allow the filling to cool to room temperature and then place it in the fridge for atleast 1 hour.

coconut cream pie. Cocobean blog

Whisk the cream, vanilla and sieved icing sugar until soft peaks form. Spoon this onto the cooled (the coconut custard filling must be completely cool) pie and then sprinkle it with gorgeously roasted coconut flakes. Now you can remove it from the pie tin (if you used a loose bottom pie tin) and place on a pretty serving plate. Slice and enjoy every single mouthful, you deserve it!

Heres the handy recipe for you:

Coconut Cream Pie

Makes one 23cm pie, serves 10

(adapted from the Hummingbird Bakery recipe from Cake Days recipe book)

Pastry:

225g plain flour, plus extra for dusting

110g butter, softened

80g castor sugar

1 large egg

Filling:

1 large egg yolks

2 tsp vanilla essence

140g castor sugar

35g cornflour

1/4 tsp salt

240ml coconut milk

350ml full cream milk

Topping:

350ml double cream

1 tsp vanilla essence

2 Tbsp icing sugar

3 Tbsp coconut flakes, roasted

To make the pastry, use an electric mixer with the paddle atachment to slowly mix the flour and butter together until crumb-like consistency. Add the sugar and then the egg, mixing gently to incorporate (you can do this by hand using your fingertips to rub the ingredients together). When a dough forms, remove it from the bowl and knead lightly on a floured work surface to bring it together. Wrap in cling film and put in the fridge to rest for 20-30 mins.

Once the dough has rested in the fridge, roll it out on a lightly floured surface (to about 5mm thickness). Carefully lay the pastry over the 23 cm tin and press it into the base and up the sides. Don’t worry if the pastry breaks or crumbles, just fill in the gaps and press it all together so that there are no holes. Cut the overhanging pastry off and prick the base with a fork. Place your base back in the fridge to rest for another 20-30 minutes.

Preheat the oven to 170 C. Once the pastry has rested, cover it with baking paper and fill it with baking beans or dry rice. Blind bake it for 12 minutes in a preheated. Carefully remove the beans and the paper and bake the pastry for another 15 minutes, until golden in colour. Set aside to cool. Well done that’s your pastry (the hardest part) done and dusted!

While the pastry is baking, you can make the filling. Place the egg yolks and vanilla in a bowl and whisk them until combined and the yolks are all broken. In a saucepan, mix the sugar, cornflour and salt together. Add 90ml of the coconut milk to it and whisk to form a smooth paste. Pour the remaining coconut milk and full cream milk into the mixture and stir to combine.

Place the pan over a low heat and bring the mixture to the boil, whisking constantly. As soon it starts to thicken, take 3 Tablespoons of the hot milk mixture and stir it into the egg yolks, then pour the egg yolk mixture into the pan. Stir this mixture continuously, until the mixture is thick and looks like custard.

Pour the coconut custard mixture into the cooled base and cover it with cling film. Covering it immediately prevents a skin from forming over the custard. Allow the filling to cool to room temperature and then place it in the fridge for atleast 1 hour.

Whisk the cream, vanilla and sieved icing sugar until soft peaks form. Spoon this onto the cooled (the coconut custard filling must be completely cool) pie and then sprinkle it with gorgeously roasted coconut flakes. Now you can remove it from the pie tin (if you used a loose bottom pie tin) and place on a pretty serving plate.

coconut cream pie. Cocobean blog

We hope you enjoy this recipe! It really is a winner xx